My daily driver is a 2004 standard roof T1N cargo Sprinter. These vans have a reputation for lasting over five-hundred thousand miles when cared for correctly. I enjoy working on these vans a ton and figured I'd start putting together some how-to posts for maintenance I couldn't find any solid information on.
My buddy and his wife have been living out of their 2006 of the same model and ran into a very expensive mechanic bill when their front wheel bearings began squealing and eventually destroyed not only the bearing but the spindle that the front hub spins on.
In light of this I looked around on the internet to see if there was a clear write up of how to perform front wheel bearing maintenance (rear wheel bearings are lubricated by the differential oil) and could not find one, so here it is for better or worse.
Bearing maintenance would be great to do while one is replacing the front shocks or front brakes as you have to remove some of the same parts to do this job.
First a disclaimer. Your front wheel bearings, if improperly reassembled, could result in catastrophic failure. This process is simple but if it seems not so, don't do it, phone a friend or take it to a trustworthy mechanic. Know your limitations and never be too proud to ask for help.
Tools, Chemicals & Supplies
- Jack and jack-stand (make sure they're rated for the Sprinter)
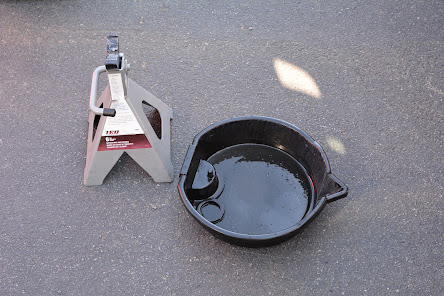
- Oil drain pan
- Short and deep 19mm socket (I used 1/2" Drive)
- Ratchet
- Impact gun (If you have access to a 1/2" it makes removing these big heavy torque bolts much easier, if not I suggest a breaker bar or long 1/2" ratchet)
- Torque wrench (not pictured, capable of a range from 125ft/lb to 177 ft/lb
- Brass face hammer
- 1/4" drive ratchet with 5mm Allen socket
- Number three flat blade screw driver
- Small pry bar
- Seal driver (a big socket works pretty well)
- High quality wheel bearing grease
- Multi purpose degreaser or solvent
- New front inner wheel bearing seals
- Rags
- Gloves (personal choice but after twenty years of being a mechanic I appreciate the lack of grease all over my hands and also everything I own)
The first step is to jack up the van and remove the front wheel on the side you are working on.
Make sure you choose solid jack points and that your jack and jack-stand have secure footing. The lug nuts are 19mm and torqued to 177ft/lbs. If you do not have an impact gun I recommend loosening the lug nuts before you lift the wheel into the air.
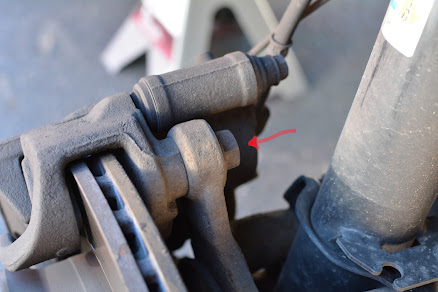
Front wheel removed. Next step is to remove the brake caliper. The caliper is attached to the spindle assembly by two 19mm bolts.
19mm brake caliper bolt indicated by red arrow.
Caliper removed. I supported the brake caliper with a flat jack in the back ground, make sure you do not let the caliper dangle by the brake line. Next we are going to remove the dust cap from the outer front wheel bearing.
I used a small pry bar to pull the dust cover off.
The item in the picture with blue paint is the wheel bearing spindle lock nut. I would take a quick picture so you know roughly where the lock nut was set before you remove it. Loosen the 5mm Allen bolt and the lock nut will unthread allowing the front hub (and brake rotor if still attached) to come off the front spindle.
Front spindle after I cleaned off old grease and grime.
Back of hub assembly. The ring with the square holes is one of the four speed sensor tone rings on the van, make sure it is in good shape and clean of debris.
I removed the inner bearing seal to remove the bearing from the hub. I purchase new seals before this job so I didn't have to worry about saving these. Make note of the depth the seal is set into the hub for when you reinstall the new seal.
I didn't take pictures of cleaning the wheel bearings or packing them with grease because I was covered in grease. Take your time to clean the old grease from the bearings and inspect for any major wear. I have read that if greased around every eighty-thousand miles these will likely last the lifetime of the van but you never know.
This link will provide a short video on the correct way to pack a tapered bearing once you have cleaned off all the old grease from the bearing and hub. Once you have cleaned and degreased the bearings it is time to reinstall the wheel seal on the back of the hub assembly. Gently drive the seal in place, it needs to be level and set to the depth of the prior seal (roughly 1.5mm deep).
Before you reinstall the hub assembly back on the front spindle it is a good time to clean the front wheel speed sensor. The sensor is magnetic and will pick up metal dust over time which can lead to all manners of chaos.
The wheel speed sensor.
The last technical step before reattaching the caliper and then the front wheel is reinstalling the front hub assembly with rotor and setting the front wheel bearing preload. The service manual process is to torque the front wheel lock nut to 9ft/lb and then turn it back one-half a turn. Here is a video on how to determine whether you've correctly adjusted the bearing.
I could not find a torque specification for the Allen on the locknut but consider the threads are 6mm I torqued it to around 7 ft/lbs.
To finish the process it is time to reinstall the caliper. I use a little blue loctite and torque to 125ft/lb. Then reinstall the front wheel. The torque specs for the front wheel are 177ft/lb. Get your van back onto the ground and repeat the process on the other side.
Feel free to reach out if you have any questions or want me to add anything. I'm sure I've omitted something or forgotten something but I tried to be clear. Have fun vannin' folks!